Near-Real-Time Location Tracking with RSSI ESP8266 and Mendix

In the world of IoT, accurate and efficient location tracking is more important than ever. This article explores how to achieve near-real-time location tracking using RSSI (Received Signal Strength Indicator) with the ESP8266 microcontroller and Mendix. Whether you’re an IoT enthusiast or a developer, this guide will help you implement a reliable tracking system by integrating these technologies.

Overview

We’ll walk you through the process in two main steps:

  1. Mendix Configuration
  2. NodeMCU Programming

1. Mendix Configuration

To start, you need to configure your Mendix application to receive and process the data from your ESP8266 device.

  • Create an Entity: Begin by creating an entity in your Mendix application that will store the tracking data. Make sure to design the corresponding overview pages to manage this data effectively.
  • Expose as REST Resource: After creating the entity, expose it as a REST resource. Ensure that you enable the security section and assign the necessary roles. The security configuration may vary depending on your specific requirements.
  • Testing and Deployment: Use local Swagger to test the REST endpoint and confirm it’s working correctly. Once verified, deploy it to your preferred environment.

Create your entity and generate overview pages.

Configure your endpoint with your security requirements.

2. NodeMCU Programming

The second part focuses on programming the ESP8266 (NodeMCU) to send location tracking data to your Mendix application. If your Mendix instance is running on an SSL-enabled server, remember to use HTTPS libraries. Below is an example code snippet that you can use as a reference. This code has been used in the demo video as well.

#include <ESP8266WiFi.h>
#include <WiFiClientSecure.h>
#include <ESP8266HTTPClient.h>
#include <NTPClient.h>
#include <WiFiUdp.h>

// Root certificate
const char IRG_Root_X1 [] PROGMEM = R"CERT(
-----BEGIN CERTIFICATE-----
XXXXXXXXXXXXXXXXXXXXXXXXXXXXXXXXXXXXXXXXXXXX
-----END CERTIFICATE-----
)CERT";

const char* ssid = "*****";
const char* password = "***********";

// Define NTP Client to get time
WiFiUDP ntpUDP;
NTPClient timeClient(ntpUDP, "pool.ntp.org");

unsigned long epochTime;

// Function to get the current epoch time
unsigned long getTime() {
  timeClient.update();
  return timeClient.getEpochTime();
}

// Create a list of certificates with the server certificate
X509List cert(IRG_Root_X1);

void setup() {
  Serial.begin(115200);

  // Connect to Wi-Fi
  WiFi.mode(WIFI_STA);
  WiFi.begin(ssid, password);
  Serial.print("Connecting to WiFi ..");
  while (WiFi.status() != WL_CONNECTED) {
    Serial.print('.');
    delay(1000);
  }

  // Set time via NTP, required for x.509 validation
  configTime(3 * 3600, 0, "pool.ntp.org", "time.nist.gov");

  Serial.print("Waiting for NTP time sync: ");
  time_t now = time(nullptr);
  while (now < 8 * 3600 * 2) {
    delay(500);
    Serial.print(".");
    now = time(nullptr);
  }
  Serial.println();
  struct tm timeinfo;
  gmtime_r(&now, &timeinfo);
  Serial.print("Current time: ");
  Serial.print(asctime(&timeinfo));
}

void loop() {
  WiFiClientSecure client;
  epochTime = getTime();
  Serial.print("Epoch Time: ");
  Serial.println(epochTime);

  if (WiFi.status() == WL_CONNECTED) {
    client.setTrustAnchors(&cert);

    HTTPClient https;
    Serial.print("[HTTPS] begin...\n");

    if (https.begin(client, "https://XXXXXXXXXXXXXXX/esp8266")) {  // HTTPS

      // Prepare JSON data
      String httpRequestData = "{\"Time\":" + String(epochTime) + ",\"Name\":\"Arda\",\"Rssi\":" + String(WiFi.RSSI()) + "}";

      https.addHeader("Content-Type", "application/json");
      https.addHeader("Accept", "application/json");
      https.addHeader("Authorization", "Basic XXXXXXXXXXXXXXXXXXXXXXXXXXXXXXXX");

      Serial.println(httpRequestData);

      int httpCode = https.POST(httpRequestData);

      // Check if the request was successful
      if (httpCode > 0) {
        Serial.printf("[HTTPS] POST... code: %d\n", httpCode);

        if (httpCode == HTTP_CODE_OK || httpCode == HTTP_CODE_MOVED_PERMANENTLY) {
          String payload = https.getString();
          Serial.println(payload);
        }
      } else {
        Serial.printf("[HTTPS] POST... failed, error: %s\n", https.errorToString(httpCode).c_str());
      }

      https.end();
    } else {
      Serial.printf("[HTTPS] Unable to connect\n");
    }
  }

  Serial.println();
  Serial.println("Waiting 5 seconds before the next round...");
  delay(5000);
}

After you first run the nodemcu your serial monitor will look like below.

Explanations on NodeMCU Section

This code is designed to run on an ESP8266 microcontroller and accomplishes the following tasks:

  1. Connect to a Wi-Fi Network: Establishes a connection to your specified Wi-Fi network.
  2. Obtain Current Time: Retrieves the current time using an NTP (Network Time Protocol) server.
  3. Establish a Secure HTTPS Connection: Creates a secure connection to your Mendix server using the provided root certificate.
  4. Send Location Data: Sends an HTTP POST request with JSON data, including the current epoch time, device name, and RSSI value, to the Mendix application.
  5. Repeat Process: The loop repeats every 5 seconds, providing near-real-time updates.

With this guide, you can integrate RSSI-based tracking into your IoT projects using the ESP8266 and Mendix, making it easier to carry out straightforward and effective proof-of-concepts.

Leveraging Playwright With Mendix

Automate Your Web Testing with Ease

Mendix applications are built to run smoothly across various web browsers. For developers working with Mendix, a leading low-code development platform, integrating comprehensive testing frameworks like Playwright can significantly enhance the quality of their applications. This article explores why and how Playwright can be integrated into Mendix applications.

Testing applications is crucial for maintaining their robustness and reliability. By incorporating unit tests, integration tests, end-to-end tests, performance tests, and cross-browser tests, developers can ensure their applications are functional, performant, and deliver a seamless user experience. Leveraging tools like Playwright enhances the testing process, allowing developers to identify issues early and deliver high-quality Mendix applications.

We will integrate Playwright into Mendix and after that we will be able to run playwright scripts directly from Mendix.

One may use the setup to preproduction checks of the application or use the setup to leverage other test processes. This configuration lets you automate your playwright scripts and leverage your playwright portfolio using Mendix.

In order to do that, we will first retrieve Playwright Maven dependencies.

Retrieving Playwright Maven Dependencies into JAR Files in Eclipse IDE

Setting Up Your Eclipse Project

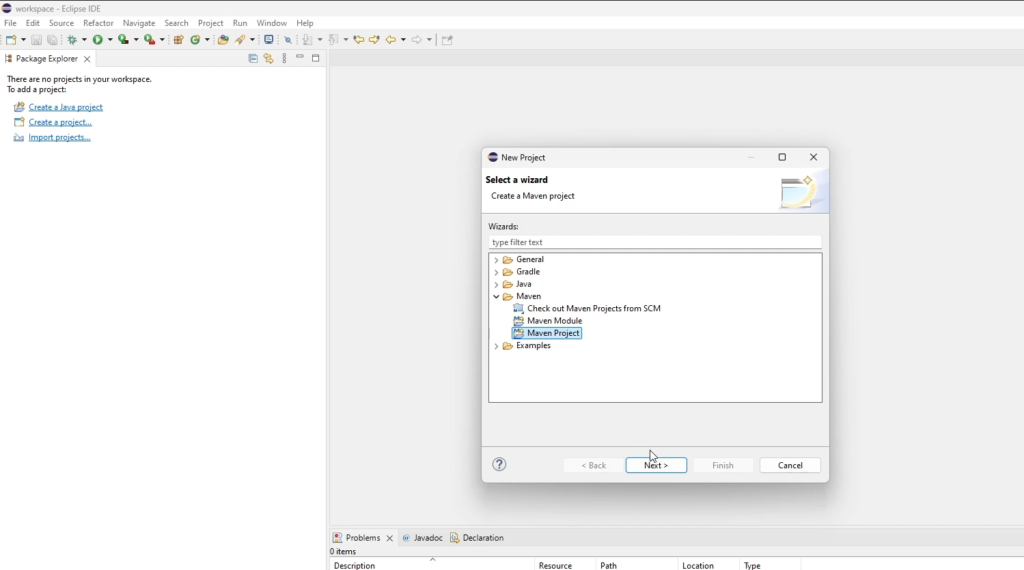
  1. Create a Maven Project in Eclipse:
  • Open Eclipse IDE.
  • Go to File > New > Other > Maven > Maven Project.

Click Next and choose a workspace location. Select an archetype, such as maven-archetype-quickstart, and click Next.

  • Fill in the group ID, artifact ID, and other project details, then click Finish.
  1. Add Playwright Dependency:
  • Open the pom.xml file in your project.
  • Add the Playwright dependency inside the dependencies section.
   <dependencies>
       <dependency>
           <groupId>com.microsoft.playwright</groupId>
           <artifactId>playwright</artifactId>
           <version>1.45.0</version>
       </dependency>
   </dependencies>

Save the jar files to use inside Mendix.

Using JAR Files in Mendix

To extend your Mendix application with custom Java functionality or third-party libraries, follow these steps to use JAR files effectively.

1. Navigate to the root folder of your Mendix project. Find the userlib directory and Copy the saved JAR files into the userlib directory.

2. Create and Use Custom Java Actions

  1. Add a New Java Action:
  • In Mendix Studio Pro, go to Project Explorer.
  • Right-click on Java Actions and select Add Java Action.
  • Define the action’s name, parameters, and return type.
  1. Write Java Code:
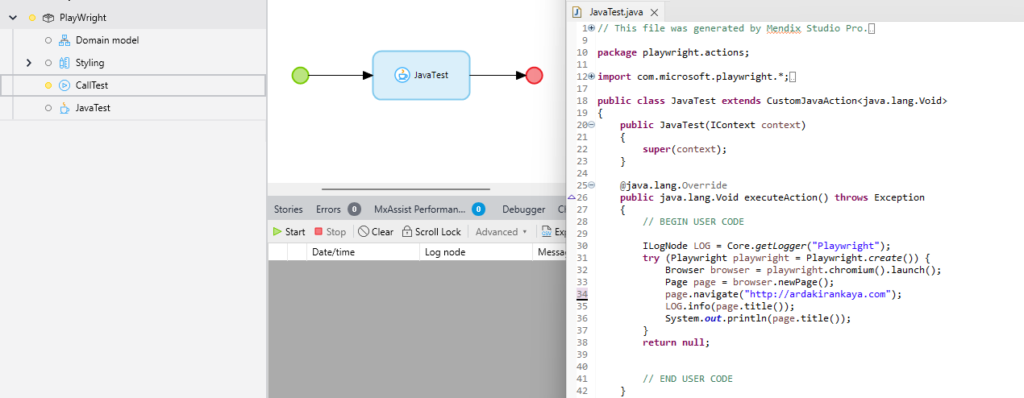
  • Click Edit Java Code to open the Java editor.
  • Import and use classes from your JAR files. Example:
package playwright.actions;

import com.microsoft.playwright.*;
import com.microsoft.playwright.options.AriaRole;
import java.util.regex.Pattern;
import com.mendix.core.Core;
import com.mendix.logging.ILogNode;
import com.mendix.systemwideinterfaces.core.IContext;
import com.mendix.webui.CustomJavaAction;

public class JavaTest extends CustomJavaAction<java.lang.Void>
{
	public JavaTest(IContext context)
	{
		super(context);
	}

	@java.lang.Override
	public java.lang.Void executeAction() throws Exception
	{
		// BEGIN USER CODE
		
		ILogNode LOG = Core.getLogger("Playwright");
		try (Playwright playwright = Playwright.create()) {
                Browser browser = playwright.chromium().launch();
                Page page = browser.newPage();
                page.navigate("https://ardakirankaya.com/");
                LOG.info(page.title());
        }
		return null;
		
		
		// END USER CODE
	}

	/**
	 * Returns a string representation of this action
	 * @return a string representation of this action
	 */
	@java.lang.Override
	public java.lang.String toString()
	{
		return "JavaTest";
	}

	// BEGIN EXTRA CODE
	// END EXTRA CODE
}

Save and compile your Java action and use it in your Mendix microflow.

Conclusion

Integrating Playwright with Mendix allows developers to harness the power of Playwright’s automation capabilities while working with Mendix. With Playwright’s robust features and Java’s widespread use in enterprise environments, this combination offers a powerful solution for automated web testing. By following the setup and examples provided, you can start leveraging Playwright inside Mendix to ensure the quality and reliability of your web applications or even use it as a web based Robotic Process Automation tool.

React Native Rest Get Request with Credentials Example

Import required libraries


import axios from 'axios';
import {Buffer} from '@craftzdog/react-native-buffer';

Build your axios header


    const username = 'username';
    const password = 'password';
    
    // Encode username and password in base64
    const encoded = Buffer.from(username + ':' + password).toString('base64');
    console.log(encoded);
    let axiosConfig = {

        headers: {
          'Accept': 'application/json',
          'Authorization': 'Basic ' + encoded
    },
      };

Fetch data


      const fetchData = async () => {
        try {
          const response = await axios.get(API_URL,axiosConfig);
          
          console.log(response.data);
    
        } catch (error) {
          console.error('Error fetching data: ', error);
        }
      };

Trigger it in your hook


    useEffect(() => {
        fetchData();
      }, []);

https://axios-http.com/docs/intro

https://www.npmjs.com/package/@craftzdog/react-native-buffer