We’re all using tools like Microsoft Teams to collaborate every day, right? It’s where we chat, share updates, and make quick decisions. So, I started thinking—what if AI could join the conversation? That’s exactly why I built the Microsoft Teams webhook component for Langflow!
Let me walk you through why I made it, how you can use it, and why it could make your life a whole lot easier.
Why I Built This Component
AI is becoming more powerful, and Langflow already makes it super easy to create workflows for AI agents. But let’s be honest—what’s the point of having a smart AI if its outputs just sit in a tool or dashboard?
I wanted a way to push AI insights directly into the spaces where teams are already working—like Microsoft Teams. Whether it’s an alert, a daily report, or an action item, sending these updates to Teams means everyone can stay on the same page without constantly switching apps.
For example, imagine:
- A customer support team gets instant notifications about high-priority tickets.
- Your IT team is alerted in Teams when an AI detects a server issue.
- Your sales team gets notified about hot leads while they’re already chatting in Teams.
This integration makes AI outputs not just useful but actionable.
How to Get and Use It
Ready to try it out? Here’s how you can get started:
-
Download the Component
- Head over to the Langflow Store (available within the Langflow app).
- Search for the "Microsoft Teams Webhook" component or click this direct link to download it.
- Click to add it to your workflow library—it’s that simple!
-
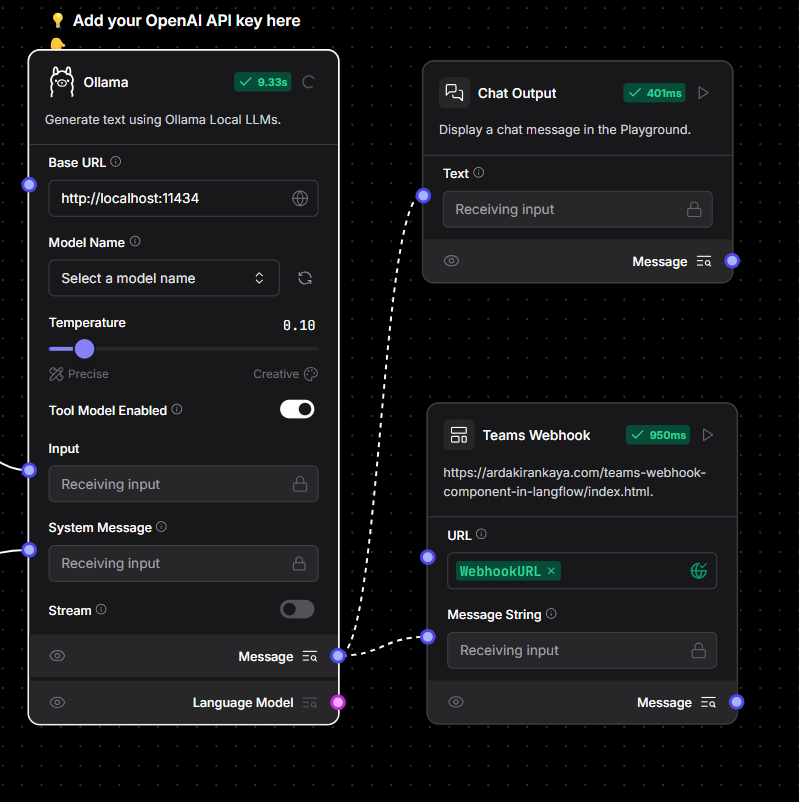
Set It Up in Your Workflow
- Drag and drop the component into your Langflow workflow.
- Configure the webhook URL for your Microsoft Teams channel (you can generate one in Teams under “Connectors”).
- Customize the message format and details you want to send.
-
Run Your Workflow
- Connect your AI workflow to the Teams component, and boom—your AI is now sending updates directly to Teams!
You don’t need to be a developer to make this work. Langflow’s low-code interface handles the heavy lifting, so you can focus on what matters—getting results.
Wrapping It Up
At the end of the day, this Microsoft Teams webhook component is about making AI more accessible and actionable. Instead of siloed dashboards or delayed reports, your AI can now deliver updates straight to where your team already communicates.
Whether you’re in customer service, IT, sales, or any other team, this integration saves time, boosts collaboration, and helps everyone stay informed.
So, why not give it a try? Head over to Langflow, grab the component, and see how it can make your AI workflows more effective. Your team (and your productivity) will thank you!